Digital cameras are such a fantastic way to preserve memories. You can take almost as many pictures as you want to, right there on the spot, and have an instant preview of what your picture looks like. You can print your pictures if you like, but you don’t have to worry about your pictures fading or being damaged beyond repair. It’s easy to make a backup of your digital pictures on computer, and you can simply print more pictures when needed.
The Organization Problem
The issue that I find when using a digital camera and storing the pictures on computer is that very soon after having used a digital camera, I have thousands and thousands of pictures that I’ve saved. If I’m trying to find a certain picture, it could take a very, very long time (time that I don’t have).
Why Care about Organizing Pictures?
If you have a hard time finding pictures, or remembering who was in the picture, the date it was taken, etc., imagine when you’re gone and your family is going through your pictures. It’ll be a mess! They won’t know what’s what and what’s where.
Save everyone a little bit of work and organize your pictures.
How to Organize My Digital Pictures
A few simple steps can help you better organize your digital pictures. The Google Pack has free software to help you easily organize your pictures.
Whether you use a visual photo organizer, there are still things that you can do to better manage hundreds if not thousands of pictures.
Organize Pictures by Folder
The following will help you organize your pictures by folder:
Step 1 – Start Your Folders
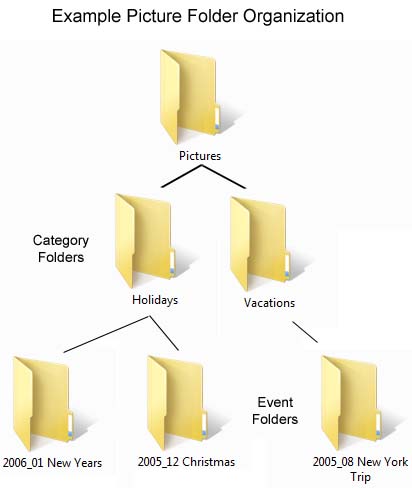
Create a folder (also referred to as a directory) on your computer and call it Pictures
Step 2 – Create Categories for Your Pictures
Inside the Pictures folder, create Category Folders to help you better categorize your pictures. Pick and choose from the options below that best suit your situation.
- Vacations
- Activities – For pictures of family activities that wouldn’t quite be considered a vacation (day at the zoo, etc.)
- Family Events – For reunions or family gatherings.
- Holidays – Christmas, Easter, etc.
- Nature – If you like taking pictures of mountains, vistas, wildlife, etc.
- Extended Family – For pictures of relatives.
- <Your child’s Name> – Create as many folders as you need to for each child. Place pictures in each folder where the subject of the picture is your child and the picture doesn’t fit in any other category.
- <Your Name & Spouse’s Name> – For pictures of you and your spouse that do not fit into any other category
- <Your Name> – For pictures that you are the subject that do not fit into any other category
Step 3 – Create Specific Folders for Events
Inside your Main Folders above, you’ll want to organize your pictures just one additional step into Sub Folders that will make finding your pictures much more easy for you and for your family. Let’s say you go on a a few vacations, take some pictures on holidays, etc. Below are examples of how to organize those specific events.
Vacations
- 2005_08 New York Trip
- 2006_05 Grand Canyon
- 2007_01 Ski Trip
- 2007_07 Trip to Disneyland
Holidays
- 2005_12 Christmas
- 2006_01 New Years
- 2006_07 Fourth of July
- 2006_11 Thanksgiving
- 2006_12 Christmas
- 2007_07 Fourth of July
You’ll now be able to find your pictures by the type (vacation, holiday, etc.), the date, and the specific event. The reason for identifying the month as a number in the example above is because the computer will list your folders by year first, and then by month. If you put 2007_December, your December folder would be listed before you 2007_January folder. See the picture below for a visual example of how the folders organization works:
Naming Your Digital Pictures
The file name you give your digital picture can be quite important if you’re searching for a picture or 40 years down the road, your family is trying to figure out who’s who in your picture. For example, if you name your digital picture file:
me at the beach.jpg
Fifty years down the road will your descendants know who “me” is? Remember that they may have thousands and thousands of different pictures of their ancestors. It will be quite easy to become confused. They won’t know for sure who is in the picture, where it was taken, and when the picture was taken. A better naming convention starts with the year followed by the month as well as the subject in the picture and where it was taken:
2007_10 John Doe at Morro Rock – CA.jpg
You may prefer to add the date at the end of the file, and that’s perfectly fine. Putting the date at the front helps to sort the picture order a little better.
For pictures with multiple subjects you could name the file:
2007_10 Doe Family – John, Jane, Julie at Morro Rock – CA.jpg
Since this example picture is from a vacation, it would be saved in the following folder structure Pictures > Vacations > 2007_10 California Trip. All other pictures from the “California Trip” would be added to the “2007_10 California Trip” folder.
Now that you’ve got a great start, go ahead and get your digital pictures organized. Your descendants will thank you.
Quick Tip: You can use the free editor Picasa found in the Google Pack to drag and drop photos to new folders and rename multiple photos all at the same time. Just highlight (or select) the photos you want to rename and press the “f2” key.
Additional Backups
Another great way to preserve and backup your digital pictures is to print them and put them in a photo album. Yep, the good old fashioned way of storing your photos won’t be going away anytime soon, and it makes it easy to view and share your pictures. If you want the modern mixed with the old fashioned, you could save your digital pictures to disc (CD or DVD) and store them in a DVD storage album for safe keeping and easy reference.