Sounds, sounds, sounds. There are lots of sounds in this world, but none so unique or as appreciated as the human voice (I could possibly be biased however). Nevertheless, the most appreciated sounds/voices to you are probably those of your family members.
That’s why it might not be a bad idea to preserve the family “voice” in some way or another. Sure, now-a-days we have video that captures so much more than sound; however, most of the time, events are captured on video and not opinions, dreams, thoughts, and life lessons.
Audio recordings offer a great way for you or your family members to express themselves and to preserve that expression with tone and feeling.
Below are listed the top 5 ways to preserve sound recordings of your memories and insights or of those that you love:
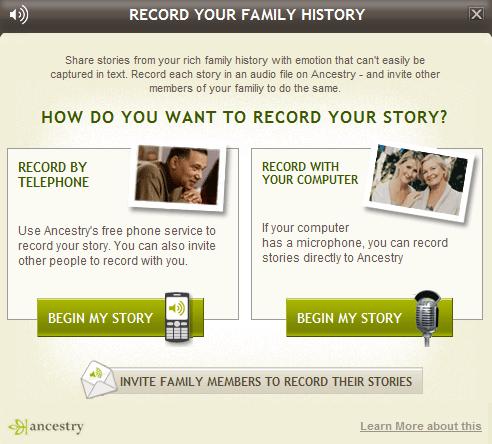
- Ancestry.com Family Tree – It almost couldn’t be easier with our top pick. You simply create a family tree on Ancestry.com using their free family tree program
, click on the person in your tree for/by whom the audio recording will be made, and select “Audio.” You’ll then be prompted to create a new recording. You can choose to have the automated service call you and record your memory, or you can record straight from your own computer’s microphone. (Example picture below)
You can share your recordings with other family members, or keep them private. It’s up to you, but let at least one other person have access to your recordings if you want them passed on some day.
- To Your Computer – Many computers have either a microphone jack or a integrated microphone. Get a microphone or use the one on your computer and record your thoughts, stories, memories, etc. If you have Microsoft Windows, you can use “Sound Recorder” or even Windows Movie Maker (using the Narration option) to record your audio. The benefit of recording straight to your computer is that you can record for as long as you have hard-drive space and you can easily make a copy of your recording for family members. When you name the audio file you’ve created, include the date, your name, and the topic you discussed.
- To a Digital Recorder – There are now many devices that will record your voice digitally. Many digital video cameras available that record to a memory card instead of a DV tape and also double as a voice recorder. You can record your stories to the device in audio format and then copy the recorded audio to your computer. Recording is a little less cumbersome since you don’t have to lug your computer around with you to get the job done, but you’ll need to know how to get the audio off the device and on to your computer.
- Professional Studio – You could visit a professional recording studio to create your memories. Be prepared to pay a lot for the service; however, you’ll get a very high quality recording in a setting where you won’t be disturbed. You’ll most likely be given a disc containing the audio files you’ve created. Just make sure you go in prepared so you don’t waste time because you’ll be paying for the time you are there.
- Non-digital Media – Recording voice to cassette tape or other form of analog recorder will still preserve audio for a while but will make extra work for someone else down the road. Media such as audio tapes will degrade over time and it will become increasingly more difficult to find devices that will play cassette tapes. Recording to tape will make it harder for someone to distribute copies of your recording to family members as making copies is a slow, manual process. Still better than nothing at all, analog recording would be our very last pick.
Tips on Recording – If you want to sound like you’re making up what you’re saying as you go when you record, that’s fine. However, you might want to consider making an outline of what you want to cover in your recording. To make things flow better, consider jotting down what you want to say so you don’t fumble with words and start the same recording over a dozen times trying to get it right.
If you’re making separate recordings of the same topic or experience, listen to your previous recording so you can pick up where you left off in terms of your tone, excitement level, and volume. It’ll make it easier for the listener who will probably listen to a good chunk of recordings in one sitting.
Purchasing a quality microphone might not be a bad idea if you’re going to record the audio to your computer. A crisp, clear recording provides a better listening experience. If you’re really serious, purchase a “pop screen” which is a little screen that is placed in between you and the microphone and prevents the “p” and “b” sounds from hitting the microphone with force making a “popping” sound.
Tips on Content – Take a moment to make a list of the various things you’d like to talk about. Try to keep each audio file you make centered around each topic. Five to ten minutes is a pretty good time frame to try to stick to for each file. Talk about things that are exciting to you so people can really come to know you better through what you’re saying. Some ideas of what you can speak about are listed in a part article on how to write a personal history.
Pass it on – When you’re finished with your recordings, share them with others through email or by disk so that your “voice legacy” can be passed on.